ZX-1 Initial Setup
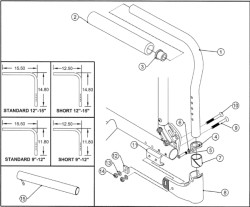
The following are all of the images from the Spinergy ZX-1 Operator’s Manual (Z100080 Rev. 4). The information in red are the adjustments that we made:
- Spinergy ZX-1 OM
- Spinergy ZX-1 OM Components
- Spinergy ZX-1 OM Joystick Module
- Spinergy ZX-1 OM Joystick Control Panel
- Spinergy ZX-1 OM Center of Gravity
- Spinergy ZX-1 OM Armrest Bracket Adjustment
- Spinergy ZX-1 OM Anti-Tilt Bolts
- Spinergy ZX-1 OM Anti-Tilt Wheel Height Adjustment
- Spinergy ZX-1 OM Cross Member
- Spinergy ZX-1 OM Height Bracket Adjustment
- Spinergy ZX-1 OM Anti-Tilt Wheel Width Adjustment
- Spinergy ZX-1 OM Joystick Module Placement
- Spinergy ZX-1 OM Wiring Schematic
These are the adjustments that we made to fit a 16″ x 18″ TiLite ZRA wheelchair (see TiLite ZRA Specifications). Because of the configuration of the wheelchair, it is a very close fit with having everything work together.
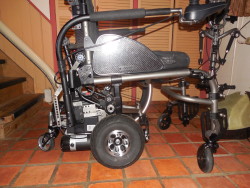
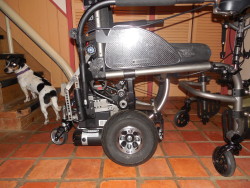
- As shipped before anti-tilt adjustments
- As shipped anti-tilt bracket left
- As shipped anti-tilt bracket right
- Armrest Bracket Adjustment (right)
- Anti-tilt Wheel Depth
- Armrest Bracket Adjustment (left)
- Height Bracket Adjustment (right)
- Height Bracket Adjustment (left)
- Clamshell open after adjustments
- Clamshell closed after adjustments
ZX-1 Adjustments
Although it is completely possible to use a ZX-1 on a chair as long as it meets the ZX-1 Specifications, in my view it is best to spec out a chair at the same time as purchasing the ZX-1, if at all possible. This is especially true if you have a lot of accessories as we do, or a non-standard configuration. Here are some points to consider:
General tips (my to-dolist)
These tips were posted by pattherat in post #471.
1. Remove the anti-tilt mechanisms. You don’t need them and they hinder the ZX1s ability to go over obstacles.
2. Remove or just unplug the proximity sensor. The sensor reduces power by 40% when the rear manual wheels are lifted a certain height. Just use caution when turning too quickly while the manual wheels are more than 1/8″ off the ground.
3. Adjust the armrest in so that they touch the uprights of your backrest. This will keep the ZX1 centered.
4. Adjust the armrest back so you can raise your front casters at least 3″ off the ground when you lean back. The armrests will keep you from tipping all the way backwards.
5. When on grass keep your weight back. This will keep the weight off the front casters and allow them to raise up over bumps. The limitimg factor off road for the ZX1 is the small front casters of your manual chair. It doesn’t matter how much power or traction the drive wheels have if your 3 or 4″ casters dig in to the ground, you aren’t going anywhere. If you plan on going off the pavement alot and want to go fast, get a Freewheel attachment. It works amazingly well with the ZX1.
6. When approaching a curb like your slider, Raise the back wheels a bit, this keeps your manual wheels from hittng the curb before the drive wheels and causing traction problems. Lean back and bump your front casters over while slowly pushing the joystick forward then power the drive wheels over. If you go in and out the slider alot just add a 3/4″ threshold ramp from a local hardware store on each side.
These tips were posted by robotnik in post #473
– I’ve removed the anti-tips, it helps on small curbs, but you’ll have to get used with the “dive” of the armrest. Especially with the joystick’s side when you use the motor’s brake, it can be surprising…
– I’ve removed the high adjustment nut stop of the clamshell, near the proximity sensor. Now I can raise my chair to the maximum without going in crawl mode,
– same problem of ZX sliding laterally on the camber bar. I’ve used 2 Serflex collars firmly bolted on the bar to fix that. Very simple and unexpensive.
– same difficulties on small curbs (more than 1″). I climb them in reverse. To make it easier, I’ve swapped the Froglegs forks and wheels. On the back of my ZX you can find the 4″ caster with the elastomer shock absorber, while the 3″ caster with aluminium washer is at the front.
Armrest Bracket Adjustment / Center of Gravity
The center of gravity for ZX-1 is directly correlated to the position of armrest brackets. On both the ZX-1 and the ZRA wheelchair, the distance from center of wheelchair rear axle to front edge of backrest vertical posts is the Center of Gravity point.
The depth behind the wheelchair backrest posts and the anti-tilt wheels should be minimal to just touching the backrest posts. We have Swing Away Tubular Armrests and they are needed when using the wheelchair manually for safety in siting upright and while transferring. I had looked into the possibility of removing the anti-tilt mechanism to see if it would help with being able to lift the casters off the ground more to get over curbs.
Pat wrote this in post #13:
The anti-tilts are there to stop the armrests from dipping down due to the ZX1 rotating forward around the camber tube because of the momentum caused by stopping abruptly when traveling down an incline. If you don’t want to use the anti-tilts you can minimize this affect by narrowing the gap between the backrest posts and the ZX1s armrests. This will however, also restrict the height the front wheels will be able to raise to get over obstacles and steep inclines.
Unfortunately, I found out that the bigger problem is the armrest bracket hitting the ZRA armrest bracket, and not the anit-tilt mechanism when we have the Center of Gravity point matching on the ZX-1 and the ZRA. There is a receiver bracket on the ZRA that extends quite far back and it is causing problems with lifting the front casters off of the ground.
I wrote this in post #174:
I’ve been reading about many of you not using the anti-tilt mechanism, and am trying to make a decision about removing it. I’m just not sure if it is even being used with how I have everything configured, and it seems to make it very difficult for me to tilt back and lift the casters off the ground with my husband in the chair.
From what I am seeing the maximum I can tilt it back to get the front casters off of the ground is about 2″ (5cm), but it takes a lot of effort on my part. Many curb cuts near us are about 1″ (2.5 cm), and even then it is hard to get over them, and I feel like I am putting a lot of strain on the fold-down push handles, and am not sure if that is wise.
The depth behind the wheelchair backrest posts and the anti-tilt wheels is about .6″ (1.5cm). I don’t think we can make it any closer because of conflicts with the wheelchair armrest brackets, which extend quite far back. The COG on the chair is set to 3″, but I have the ZX-1 armrest bracket as far back as it goes in the 5th hole to not interfere with the wheelchair armrest brackets. This is further than the documented amount based on the 3″ COG, but we had no choice because he needs the wheelchair armrests when not using the ZX-1.
Pat wrote this in post #188:
This should be fairly easy and is key for proper functioning of the ZX-1. There should be no space between the anti-tilt wheels and the backrest uprights. Your ZX-1 armrest brackets are not adjusted correctly and should be moved forward. This is your problem. The ZX-1 won’t function properly with those manual chair armrest brackets. You need a T-style armrest on the manual chair.
I wrote this in post #191
I think that you are saying that the center of gravity for the ZX-1 is making it difficult to tilt the front of the chair regardless of the anti-tilt mechanism getting in the way — is that correct? The center of gravity on the ZX-1 = 5″, ZRA wheelchair = 3″.
My husband has had the “T-style” desk arms with rigid side guards on another chair and we both hated them. They were heavy, hard to get off for transfers, and rattled around a lot. He now has an ADI seatbase with fold down sideguards and swing-away armrests that work very well for him.
I had thought that we had just enough room for the wheelchair armrest brackets and the ZX-1, so now I am in a real quandary for knowing what to do. This might sound crazy, but has anyone ever mounted the joystick on TiLite swing-away armrests?
They look to be the same diameter at 1″. Another idea would be to use the ZX-1 armrest and add an arm stop and hole (part 4 in the drawing below) so it can be used in the ZRA bracket. I don’t know, maybe it would just make the whole chair spin around on the camber tube, but it would certainly help with being able to keep his armrests when he is not using the ZX-1, which is most of the time.
Pat wrote this in post #203
The ZX-1 and COG, let me try to explain it a little better. The less COG you have, the more forward your body(weight) is in front of the camber tube which is what the ZX-1 attaches to. The camber tube can still rotate in the ZX-1 clamshell after it is attached as when you lean back into a wheelie or when the front casters go over an obstacle or start up a ramp. In those situations ZX-1 still has its drive wheels and it’s trailing rear caster on the ground. This is how it needs to function and it should do this fairly easily. if the ZX-1 was rigidly attached to your chair, you would have a vehicle with three wheels in a row and if you tried to say go up a ramp the middle wheels would be lifted off the ground. Since these are the drive wheels on the ZX-1, you wouldn’t get very far. So the less COG, the harder it is to raise your front casters because your weight is forward of camber tube. Now the opposite unwanted affect of having the middle drive wheels hingeably attached is having the rear trailing caster come up off the ground while the ZX-1’s drive wheels and the manual wheelchair’s front casters are still on the ground. This can happen when going down a hill and stopping abruptly and also backing up a hill fast. Since the armrests and joystick are attached to the ZX-1, they will dip down. This is caused by the momentum of the users weight being thrust forward over the hinged joint (clamshell/cambertube coupling) and the fact that the clamshell is directly above the drive wheels. The less COG, the more likely this is to occur. The anti-tilts all but eliminate this if they are setup correctly for the user. This could probably be solved better by having at least one forward caster that stays on the ground but is allowed to raise up over obstacles like many of the mid-wheel drive 6 wheel chairs do. I hope that helps. I think if you can get at least 3″ of COG it will function better.
I wrote this in post #206
This photo is of the ZX-1 with the armrest bracket/COG set to 4” and the ZRA COG set to 3”. The problem is that the ZRA armrest bracket makes contact with the ZX-1 armrest on any type of incline or getting over curbs.
This photo is with the ZX-1 armrest in the ZRA armrest bracket. I wanted to test this after mentioning it in post #191. I had thought this would cause the chair to spin on the clamshell. It seemed to work okay, and the force of my body weight kept it from spinning (Newton’s second law). It also made it so that the armrests did not lower going down a ramp or raise going up a ramp.
I would need to remove the ZX-1 armrest bracket, but that looks doable. I would also need to find a way to make the armrests fixed (not swinging around) in the ZRA brackets. I don’t think it would be difficult — add an arm stop and hole in the ZX-1 armrest (part 4 in the drawing in post #191).
Pat wrote this in post #208
That may work ok as long as you leave the anti-tilt mechanisms in place. The armrests on a ZX-1 originally acted as its only means of anti-tip as they would hit the backrest and stop the chair from flipping too far. Without them them manual chair could flip all the way backwards. The other problem is it will be harder to line up when backing in to engage the ZX-1 and then you’d have to reach down and pick up the armrests off the floor? So be carefull using the anti-tilts as the only means of anti-tip or figure some other backup way to stop the chair from flipping backwards. You only need the front casters of the manual chair to raise 2 to 3 inches max off the ground. Yes that does solve the armrest from dipping but you lose the ability of quickly engaging and disengaging from the ZX-1.
Current testing
Most of this is also written in post #210, but I made some updates to parts needed since then.
As it is now, he needs help with engaging to the ZX-1, but he can often disengage without much help. Although it is our hope that someday he may be able to use it independently, the reality is that he almost always has assistance due to not being able to see and coordinate because of vision and functional deficits.
We’ve weighed up all the options based on my current understanding, which I hope I got right. I’m going to include it all here, so that I remember and also for others who might have a similar situation with needing armrests/brackets on their chair. I would also be very appreciative for any more input anyone has.
I’ve tested what I can test fairly easily, but ideally I would like to be able to test all of the options before making a final decision. I tried to make some better photo’s with my husband in the chair. The photo’s show the ZX-1 armrest bracket set to 4″ and the ZRA COG set to 3″. The first photo shows the ZX-1 armrest in the ZX-1 armrest bracket. The Second photo shows the he ZX-1 armrest in the ZRA armrest bracket.The red arrows show the contact points and when they happen.

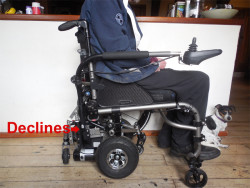
1) Use the ZX-1 armrests and ZX-1 armrest brackets. Keep the ZX-1 armrest brackets and the anti-tilt mechanism to keep the chair from tipping too far backwards. We will move the COG on the ZX-1 to have the anti-tilt mechanism at the optimal setting of 3” to match the 3” COG on the ZRA. The ZX-1 armrest brackets will be moved back to 5” to be used as a backup anti-tip. We would do this with an extra set of ZX-1 armrest bracket nuts, washers, and bolts.
Assumptions: We are assuming that there are no reasons not to mount the armrest brackets separate from the anti-tilt bracket. We are assuming that the anti-tilt mechanism set correctly to the COG on the ZX-1 at 3″ and the ZX-1 armrest brackets moved back to 5” there may be enough clearance to raise the front casters.
Pros: Will not lose the anti-tilt mechanism or the ZX-1 armrest brackets as a backup anti-tip . We only need an extra set of ZX-1 armrest bracket nuts, washers, and bolts.
Cons: Will restrict the amount we will be able to raise the front casters off the ground for curbs and make it more difficult when going up inclines. May cause damage to the ZX-1 armrests over time, because the ZRA armrest bracket hits it.
Parts needed: ZX-1 Armrest / Anti-tilt fasteners
- 8) M6X25mm Button Head Hex Socket Cap Screw Stainless A2 ISO 7380
- 8) M6 Nylock Nuts Stainless A2 DIN 985
- 8) M6 Washer 18 OD Stainless A2 DIN 9021
Testing results: I think I am making progress.From what I am seeing with basic testing, this might work. With the the anti-tilt mechanism at the optimal setting of 3″ to match the 3″ COG on the ZRA and the armrest brackets moved back to 5″, there appears to be plenty of room to to tilt the chair back without the ZRA armrest brackets coming into contact with the ZX-1 armrest brackets. The only problem I encountered is that there is not enough space on the upper armrest bracket hole to insert a washer because it conflicts with the upper horizontal member of the anti-tilt mechanism bracket. I don’t think this is a big issue.
I’m still messing with the D’s Locks, because they are causing the conflict with the ZRA anti-tips from being in the most vertical position as possible. I had to lower them again because they were not engaging well. It really helped when I raised the front casters to test adjustments, and just wish I would have thought to do that earlier.
I was able to raise the front casters 2.25″ (6 cm) off of the ground. I was able to get a piece of paper between all of the contact points, but it is very tight. Our house has a lot of indoor ramps and in my testing I had no issues with backward tipping. Although it might not be optimal, it seems as though the ZX-1 armrests, rather than the ZX-1 brackets, will act as a backup anti-tip. I know this might cause more wear on parts, but it may be a compromise we need to make to be able to keep the ZRA armrests.
- Casters on ground right side
- Casters on ground right side
- Casters on ground left side
- Casters on ground left side
- Casters raised 2.25″ (6 cm) right side
- Casters raised 2.25″ (6 cm) right side
- Casters raised 2.25″ (6 cm) left side
- Casters raised 2.25″ (6 cm) left side
2) Use the ZX-1 armrests and fit them to the ZRA armrest brackets. Keep the ZX-1 the anti-tilt mechanism to keep the chair from tipping too far backwards. We will move the COG on the ZX-1 to have the anti-tilt mechanism at the optimal setting of 3” to match the 3” COG on the ZRA. The ZX-1 armrest brackets will be moved back to 5”, but will no longer be used as a backup anti-tip because the ZRA armrests would no longer come in contact with it. We would do this with an extra set of ZX-1 armrest bracket nuts, washers, and bolts.
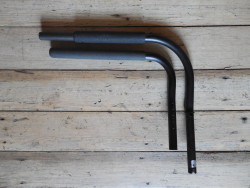
The ZX-1 armrests will need to be modified to add arm stops with arm screws/washers and through holes. We will leave the ZX-1 armrests extending below the ZRA armrest brackets unless they interfere with declines because of making contact with the ZX-1 armrest brackets, in which case they will need to be cut-off, making it more difficult to engage. When using the ZX-1 the armrests will be moved to the ZRA armrest brackets after engaging with the ZX-1. When not being used, the armrests will be stored on the ZX-1.
Assumptions: We are assuming that there are no reasons not to mount the armrest brackets separate from the anti-tilt bracket. With using the anti-tilts as the only means of anti-tip we may need to figure some other backup way to stop the chair from flipping backwards. We may need to experiment with the placement of the joystick cable so there is enough slack to move it to the ZRA armrest brackets with the shroud on.
Pros: Will be able to engage/disengage with the ZX-1 armrests in the ZX-1 armrest brackets. Will not restrict the amount we will be able to raise the front casters off the ground for curbs. Will not lose the anti-tilt mechanism. The armrests will not lower going down a ramp or raise going up a ramp. We already have the ZX-1 armrests and the addition of the ZRA armrest stops will still allow them to be used in the ZX-1 armrest brackets.
Cons: The ZX-1 armrest brackets will no longer be used as a backup anti-tip Will need to move the ZX-1 armrests to the ZRA armrest brackets after engaging and move them back to the ZX-1 when disengaging. Because of the bend on the ZX-1 armrests the ZRA arm stop will will be over an inch higher, but we do not think this will cause any problems.
Parts needed: ZRA Arm Stops
- Parts from option 1) ZX-1 Armrest / Anti-tilt fasteners
- 2) CP104306 Arm Stop
- 2) CP104320 Arm Screw (1 3/8 with 5/32 hex head with about .25″ thread at bottom)
- 2) HD100272 1/4″ High Collar Split Lock Washer
- Armrest Arm Stop CP104306
- Armrest Arm Stop Screw CP104320
- Armrest Arm Stop Washer HD100272
Testing results: I think we are going to have a hard time with this, because with the placement of the joystick cable there is not enough slack to move it to the ZRA armrest brackets with the shroud on.
3) Use one ZRA armrest and fit the ZX-1 joystick to it. This is the same for everything as mentioned in option 2) Use the ZX-1 armrests and fit them to the ZRA armrest brackets, except only one ZRA armrest will need to be modified to add a detent hole for the ZX-1 Armrest extensions and the foam will need to be cut out of the front of the ZRA armrest. Because the armrest will not extend below the ZRA armrest bracket it may be more difficult to engage/disengage because it will be about 3.75″ lower on the ZX-1.
Parts needed: Swing Away Armrest
- Parts from option 1) ZX-1 Armrest / Anti-tilt fasteners and option 2) ZRA Arm Stops
- 1) CP102074 Swing Away Armrest Tube Short 7 3/4 – 10 3/4 Right
- 1) HD100112 Foam Grip for 1″ Tubing, .940 I.D. Z .125 Wall x 12″ Long
- Armrest Tube Short CP102074
- Armrest Foam Grip HD100112
Testing results: I think we are going to have a hard time with this, because when you don’t have the armrests on the ZX-1 the little bugger takes off in all directions and it’s really hard to navigate it by holding the armrest. The lining up to engage/disengage was not so bad, but I really think it would be better to have the armrest brackets in place.
ZX-1 and ZRA armrest comparison
This is a comparison between the ZX-1 and ZRA armrests. This photo shows the ZX-1 Armrest (top) with the Arm Stop moved from the ZRA Armrest (bottom).
- Both the ZX-1 and ZRA armrests have what appears to be a 1” outside diameter, and the inside diameter appears to be the same on both.
- The ZRA armrests have a 15.5” length and 11.8” height. The ZX-1 armrests have about a 14.75” length and about a 16.4” height.
- The ZRA armrests have about .75” more length than the ZX-1 armrests. With the ZX-1 armrest extensions the ZX-1 armrests have about 3.5” more length than the ZRA armrests.
- The ZX-1 armrests have about 4.6” more height than the ZRA armrests and a .75” end cap to fit in the armrest bracket. The extra height is needed because the ZX-1 armrest brackets are much lower than the ZRA’s mounted at the seat frame. They have a bend that will limit the placement of the ZRA arm stop and make them higher..
- The ZRA armrests have an Arm Stop to fit in the armrest bracket. The through holes in the armrest are about .25” (6.5 mm).
- The ZX-1 armrests have a detent hole about 1″ from the end of the armrest.
Anti-tilt Wheels Height Adjustment
The anti-tilt wheel width adjustment is done to raise the anti-tilt wheels to between 1 and 2 inches below the backrest rigidizer bar.
Backrest Rigidizer bar
The 4” Deep Backrest Rigidizer Bar, with it’s height at 6” above the seat frame is a bit lower than we would like with the ZX-1, and also in general when needing to lift the chair. When we ordered it was not an option for the ZRA to specify a Custom Height Backrest Rigidizer Bar, but if we could have, we would have wanted it at about 7-8″ to avoid the anti-tilt mechanism.
Backrest release bar
We have a Backrest release bar that locks when folded. We need the release bar in order to fold the backrest down so we can transport the chair in the auto. Because of the low height of the Backrest Rigidizer Bar there was a conflict with the anti-tilt hitting the Backrest release bar, but I was able to work around this by adjusting the anti-tilt height.
Anti-tilt Wheels Width Adjustment
The anti-tilt wheel width adjustment is done to widen the adjustable cross member as necessary to fit width of wheelchair. It is currently set to 13.38″ / 34cm measured outside-to-outside of the cross member. The clamshell width is 9″ / 23cm.
User Friendly Flip-up Anti-Tips
The anti-tip receivers are mounted on the camber tube. They can be flipped up and out of the way when using the ZX-1. It was a very tight fit with the ZX-1 clamshell because there is only about 1 cm (3/8″) on each side of the clamshell. There is only about 2 mm (1/8″) behind the anti-tip receivers, and only 1-2 mm of space under them. I do not think they are coming in contact with the ZX-1 cross member. Because of the Anti-Tilt Wheel Height Adjustment, I do not see any way to give more space unless I raise it to about .1 cm (3/8″) below backrest rigidizer bar.
D’s Hub Locks
The D’s Locks Piston Assembly also caused some conflicts. The D’s Locks are 100% necessary to be able to lock the wheelchair with one arm/hand. We found that by rotating it to the top we were able to get more room so that the ZX-1 cross member could clear the anti-tip receivers.
Anti-Tilt Gas Springs
Update: October 2013 We were having a problem tilting the anti-tilts even a small amount to get over door sills. Here is what Pat the inventor wrote:
The anti-tilt should compress as the wheelchair tilts and not block it from tilting. You have the incorrect gas springs on your anti-tilts. I recommend the following:
User Weight / Gas Springs
<120 / 20 lb
120 – 145 / 30 lb
145 – 170 / 40 lb
170 – 195 / 50 lb
195 – 220 / 60 lb
220 – 250 / 70 lb
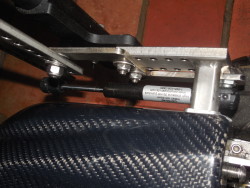
We received new 40 lb. gas springs from Spinergy to replace the original 70 lb. gas springs that were delivered. They are 7.5″ Columbia Struts CS750-40 (40 = force). Apparently the are considered standard extension/compression gas springs or “struts” (non-locking).
- Columbia Struts CS750-40
- Diagram Columbia Strut
There was no documentation included with the gas springs about how to install them. Based on what others advised, I contacted Spinergy. They very kindly sent a video of installing them. We were able to install the new 40 lb. gas springs, but only temporarily. The new 40 lb. gas springs were a different type than the 70 lb. gas springs. It appears that the “lid” that you need to prop up on the ball socket has changed, and it was not necessary to remove it. Unfortunately, the video that Spinergy sent were for the other gas springs, and we followed it. That meant that we had to force the “lid” back, and it damaged them.
We got Spinergy on the phone right away, and they sent out a new set. On the new type of gas springs the “lid” no longer needs to be propped up on the ball socket. You just click them on the ball head. We got them installed quite quickly, and they are good to go now.
How to Replace Anti-tilt Gas Springs Video
IMPORTANT: You may not need to prop up the ball socket with a screw driver as shown in the video. Check first, or you could damage it like we did.
Raising the clamshell?
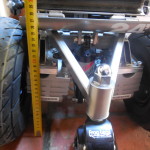 I’m not sure why the clamshell is too high, but it is causing me to need to lift the chair while occupied to get it onto the clamshell. We had another ZX-1 with the same configuration, and did not have the problem with needing to lift up the chair to get it onto the clamshell.
For both ZX-1’s I had specified the camber tube height (floor to tube bottom): 10 7/8″ (276.225 mm), which looks about like what it is on the ZX-1. I think the problem is the floor surface, which is old uneven tiles or uneven hard boards. I’ll give it a try to let a little air out of the ZX-1 tires.
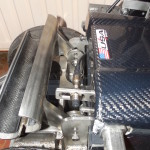 I would still like to know if there is any way to adjust the clamshell height, especially if we decide to get foam filled tires, because I won’t be able to let air out of the tires. When I was on the telephone with Spinegy a while ago, they seemed to say that there was a way to adjust this, but did not tell me how. If I recall, he said something about the actuator.
I was taking a look at it and it looks like there are 3 bolt holes to hold the clamshell on, but ours is already set at the bottom hole, so I don’t think there is anything we can do with that. The only other thing I can think of is to lower the front FrogLegs fork. It is currently on the middle hole of 3 on the fork.
Extended Armrests for Joystick Adjustments
Update: August 2014 The dealer installed the new extended armrests for the joystick. They work great, and are definitely going to make it easier for my husband to use it. I think especially for people with longer arms they are quite useful. The armrest extensions are 4.25″ (10.5 cm) which also extends the joystick another 2″ (5 cm) .
We had both armrests replaced to work with the armrest extensions. New armrests were necessary because the armrest extensions have a detent on them that only works with the new armrests that have detent holes about 1″ from the end. Other than that, they are identical to the other armrests. The extensions feel very strong, and appear to made from a composite. I think they could handle weight shifts, but they do not have the foam covering on them. What I thought was a joystick extension was not. It is the same joystick module bracket but there is a ridge inside the armrest extensions that keeps it from going back so far.
Note: It is not necessary to take the joystick off of the joystick bracket to install the extension.
- Standard armrest on right, armrest extension on left
- Extended armrests
- Armrest extension with joystick bracket components
Manitou Radium Shock (Comp)
On the first ZX-1 it had a X-Fusion O2 RL Air Shock, but on the newer ZX-1 it is a Manitou Radium Shock (Comp). We are looking for anything we can to soften/dampen the ride, and I’ve wondered if there is anything we can do with the shock. Nothing is in the owners manual about filing the shock or how to maintain it.
I could not find a lot of information about the the shock. It appears to be the OEM version of the Pro and Expert, but the Rebound Adjuster knob is different and the main spring air valve is at a different angle.
These are the specs:
| Weight Lb / grams | .50 / 229 |
| Damping | Shim Stack |
| Canister Diameter | 43mm ID |
| Adjustments | Air Rebound |
| Air Valve Type | Straight, Short |
| Damper Shaft Material | 10mm Aluminum |
| Damper Shaft Finish | Hard Anodize |
| Damper Body Color | Black Hard Ano |
| Bushings | Steel/Teflon |
| Eyelet Hardware | 2-pc Aluminum through 37.9mm 3-pc S.S. at 38mm and wider |
| Graphics | New |
| Availability | OEM Only |
This is question was asked by robotnik in post #178:
Pat wrote this in post #189:
The shock on the ZX-1 does nothing and if not adjusted to support the users weight can cause problems like spinning of the drive wheels. The reason the manual wheelchair wheels are raised slightly is so that the users weight is transferred directly to the ZX-1s drive wheels. If the shock doesn’t support the users weight then that weight is transferred to the manual wheelchair wheels causing loss of traction. Even if the shock was setup correctly for the user, because the ZX-1 driven with the manual wheelchair wheels no more the 1/8″ off the ground, there is no room for it to travel. It should be replaced by a solid linkage. If your shock has no air in it I would put at least 90psi in it and then lock it out.
Froglegs Forks and Casters
We were considering replacing the aluminium shaft with a Shock Absorbing Polymer on the back Froglegs fork to see if it helps with shock absorption (the front fork has the polymer).
- FrogLegs Ultra-Sport Suspension Fork
- FrogLegs Shock Absorbing Polymer
- FrogLegs EPIC Aluminum Wide Softroll Caster
This is some information from the original inventor Pat posted in post #528:
On one of the RESNA tests where a 250lb user travels down a 6 degree ramp at full speed and turns suddenly and reverses direction 180 degrees and travels uphill, if the rear wheels of the manual wheelchair are too high during this maneuver, the chair could tip over sideways. When trying to find a solution it was observed that the rear Frogleg fork deflected and possibly added to the problem. The real solution came by adding a proximity switch that reduced the speed to 40% when the manual wheelchair’s rear wheels are lifted too high by the ZX1. It’s important to keep your rear wheels as low as possible at all times, even slightly scrubbing the ground. They act as a sort of training wheel or outrigger. The ZX1 is allowed to raise the manual wheels higher for when encountering obstacles like thresholds where the rear manual wheels may interfere with traction to the drive wheels. After manuevering past the obstacle you should lower the rear of the manual chair to the safe driving position.
To be clear I don’t work for or represent Spinergy and they must make the final decision on what they think is necessary to put out as a product that they feel is safe in every possible use. I can only give my advice.
Having said that, in my opinion it is a non issue and a polymer could be used. I have them on all of my ZX1s and they are on the others that I originally built and sold with no problem that I’m aware of. I would though recommend getting their stiffest polymer. Under normal use the difference will be negligible because most of your weight is transferred directly to the drive wheels.
This is questions by robotnik in post #178:
– you have removed the front caster? So when your ZX plunge frontside after strong braking, there’s nothing to stop it ?
– you seem to have the elastomer of the back caster still in place. Mine is “aluminium elastomer” (Alustomer ?). I’ve read here that with the elastomer, the caster was sometime grabbing on the motors? But I think it gives a smoother ride too? Am I right ? and isn’t it possible to jump over small curbs on reverse, if it is too difficult frontward ? (for exemple if you can’t pop a wheelie, or if your footplate drags…) I’d like to try, but I’m afraid to put too much stress on the FrogLeg fork with this Alustomer…
This was the response by Pat in post #189:
That front caster was originally put there to limit the armrests from dipping down on sudden stops. That problem was much better addressed when I designed the antil-tilt mechanisms. The front caster is obsolete and does nothing. Why Spinergy continues to include it is beyond me.
On the original design we found if the polymer was compressed while in reverse or the caster was just turned to face forward and enough pressure was placed on the backe caster, it could contact the back of the actuator.
So instead of lengthening the frame a little or changing to a sold fork, this was their solution. So yes it is now a completely useless overpriced Frogleg with an Alustomer!
Linear Actuator
We have not needed to do this, but someone else we know has, and provided me with the website for where to find it. Firgelli Automations 3″ Stroke 200 lbs Force Linear Actuator, Model: FA-240-s-12-3 . This is the spec sheet FA-35-70-150-240-Spec (price 2014 $129.99).
How to run a Firgelli actuator
Previous Anti-tilt Adjustments
I am leaving this information available in case it is needed in future.
Update August 2014: While the dealer was here we took a look at the actuator because of a loud “thump” we have when raising it, despite the anti-til mechanism adjustments we made earlier. The dealer took at a look at it and said that he did not think it was working properly. He said that the actuator should close the clamshell and then raise. What it is doing now is first raising, and then closing the clamshell. He did some testing with holding down the actuator until the clamshell closes, and we do not have the “thump”. We could not determine the cause of this. After discussions with Spinergy, they decided it was best to replace the ZX-1.
I have made a video showing this:
Update: November 2013
We were having a “thump” when we raised the actuator on the ZX-1. Although the anti-tilt height adjustment is between 1 and 2 inches of the backrest rigidizer bar (as documented), it was hitting the Tishaft Back release bar on the wheelchair.
We really struggled to get the placement of the anti-tilt mechanism correct. What we realized was that there were problems with the amount of space that we have below the backrest rigidizer bar and also the anti-tilt assembly is not the same on both sides.
We were unsure what the depth should be behind the wheelchair back post and the anti-tilt wheel. Because of the backrest rigidizer bar placement height was quite low, we only had a small margin for this adjustment, about .5-1″. After much trial and error we realised that the anti-tilt did not appear to be straight and was misaligned. We needed to put the screws in different holes on each side of the armrest backrest and height bracket.
- Testing after anti-tilt adjustments
- Trial and error with anti-tilt adjustments
- Making anti-tilt adjustments
- Rigidizer bar placement
- Anti-tilt misalignment
I made a video with Rob in the chair and also without him in the chair to show the ZX-1 Power Add-on Anti-Tilt mechanism hitting the back release bar on a TiLite ZRA.


